6.8 KiB
Android App
Installation
OpenLP gives you the ability to control your service from an Android based smartphone. The following tutorial will describe how to install and use the application. For this example we will be using a LG G2. Other Android smartphones or tablet may vary slightly in appearance.
Open the Google Play Store app and search for OpenLP, and
you will find OpenLP - Remote 2. As an alternative use this link
<https://play.google.com/store/apps/details?id=org.openlp.android2>
to go to the apps page in Google Play Store. Now install the app.

You can now start the app and when you do you will see the startup screen.
Android application settings
After the installation is complete and you open the OpenLP Android application you will need to configure your preferences and settings.

Open the settings by opening the menu in the top right corner and
choosing Settings.
This will show the preferences.
Display Text Size

- Select display text size:
-
This allows you to change the the font size for the application display.
Set Custom Timeout
In general the OpenLP Android application will work fine without having to change the custom timeout settings. If you experience connection issues or are having trouble staying connected, you can change these settings.

- Enable Custom Timeout:
-
Check this box to enable setting a custom timeout.
- Connection Timeout:
-
Once Custom Timeout has been enabled you can set a custom connection timeout here.
Server Details
You will need to configure the server settings you will use with your
phone. You can find these instructions and settings in the OpenLP
desktop application under remote_tab.
Note: To use the Android application you will need to be on the same network as the main computer.
- Hostname or IP:
-
Enter the
Server on IP addressfound inremote_tab. After entering the IP address in the box selectOK - Port:
-
Enter the
Port numberfound inremote_taband enter it in the box. By default this is 4316. After entering the port number selectOK. - Use HTTPS:
-
This specifies if HTTPS should be used. Note: To use HTTPS you must setup OpenLP to be secure, see
secure_server. - Username:
-
Here you can enter a username used for accessing OpenLP remotely. This must be the same as set in
user_auth. - Password:
-
Here you can enter a password used for accessing OpenLP remotely. This must be the same as set in
user_auth.
Using OpenLP Android Application
After you have completed the setup you are now ready to use the app. Touch the menu button in the top left corner to see the list of views the app supports.

Service List
Selecting Service List will take you to the Service
Manager. Selecting an item with a short press in the service will
immediately take it live on the projection screen and you will stay on
the service screen on your device. Selecting an item with a long press
in the service will immediately take it live on the projection screen
and to the live display on your device. You can also move up and down
through the service items using the Previous and Next buttons as shown below. Use your hardware
back button to take you back to the main screen.

Slide
If you selected a service item with multiple verses or images you can
change verses or images by either selecting them with your finger or
using the Previous
and Next buttons.
Use your hardware back button to take you back to the main screen.
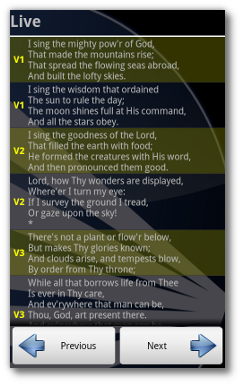
Live
Selecting the Live button will display what ever is live at the
time from to your Android device. Use your hardware back button to take
you back to the main screen.
Display
Selecting the Display button will give you the ability to blank
and unblank your projection screen from your chosen method above <droid_blank>.
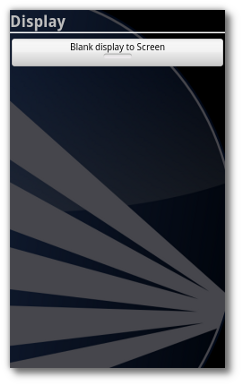
The title Blank display to means your display is live.
Touching the Blank display to will blank the projection screen
to the chosen method defined in Settings and the button will change to
Reset display from. Touching it again will cycle
back to Blank display to unblanking the screen for the
live display.
Stage
Selecting the Stage button will display the stage view on your
Android device. See the stage_view section in the manual for a detailed
description. Use your hardware back button to take you back to the main
screen.

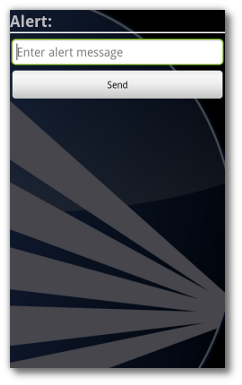
Alert
You can send an alert to the projection screen by entering the text
in the box and clicking on Send. The alert will be displayed as you have it
configured in configure_alerts. Use your hardware back button to
take you back to the main screen.
Search
Using the search function gives you the ability to search for a particular media, add it to the service or display it immediately.
To use search, press the hardware magnifying glass button on your
phone or you can press the hardware menu button and then select Search and you will be
taken to the search screen.
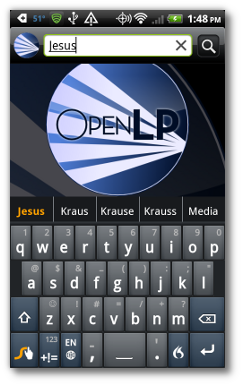
Enter the text you want to search for in the text box at the top. For this example we are using the search word "Jesus". You can click the magnifying glass next to the text box or press the return on your phone keyboard. You will be presented with a list of media in which your search word was found.
Note: When searching the Bible you must enter the exact name, chapter, verse or verses. Searching songs will search titles and lyrics with the text used.
This screen shows the number of instances your searched text is found.
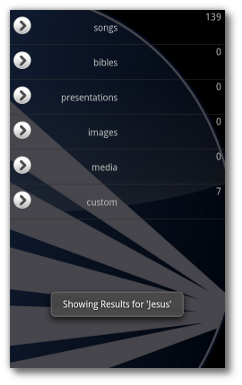
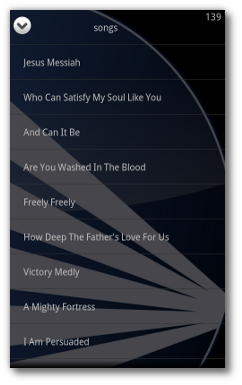
As you can see in the example, there are 130 songs with the word "Jesus" in them. You can scroll through the list of songs until you find the one you want.
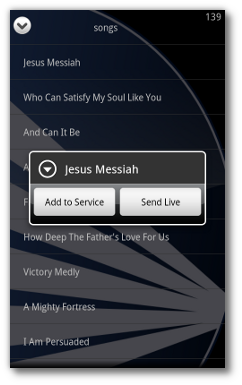
Click on Add to Service to add your media to the bottom of
the creating_service.
Click on Send Live
to immediately display your media on the projection screen.
When you have completed your search you must press the back button on your phone to return to the main screen.