16 KiB
Library
Once you get your system set up for OpenLP you will be ready to add
content to your g-service-manager. This will all happen through the
g-library. The g-library contains all the
Bibles, Songs, Presentations, Audio files, Visual files, and Custom
Slides that you will project through OpenLP.
If you don't see the "Songs", "Bibles" and other library items in the
g-library, then refer
to t-no-library-items
in the troubleshooting guide.
Songs
Clicking on Songs in the g-library will display the songs library item. The
songs library item shows a list of all the songs in the songs
database.
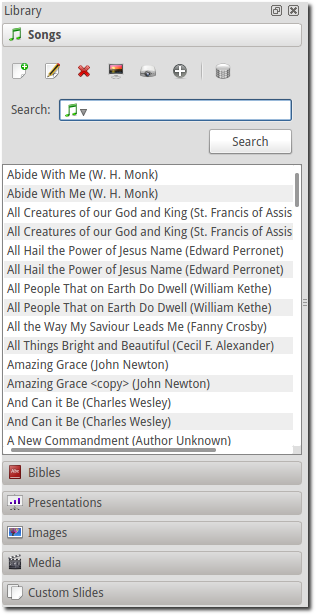
Toolbar
 Add
song:
Add
song:-
Open the song edit dialog to add a new song.
 Edit
song:
Edit
song:-
Open the song edit dialog to make changes to the selected song.
 Delete song:
-
Remove the selected song(s) from the song list.
 Preview song:
-
Send the selected song to the
g-preview-slide-controller.  Send
song live:
Send
song live:-
Send the selected song to the
g-live-slide-controllerto be shown on the display screen.  Add
song to service:
Add
song to service:-
Add the selected song(s) to the
g-service-manager. Songs can also be added to theg-service-managerby means of drag and drop from theg-library.  Maintain
authors, topics and books:
Maintain
authors, topics and books:-
Open the song maintenance dialog to add, edit or delete authors, topics or song books.
Note: Right-clicking on a song in the list will display some of the same options.
Search
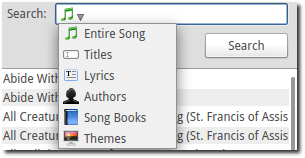
Clicking on the icon in the search box displays a list of search options. The following options are available:
 Entire
Song:
Entire
Song:-
Search the title, lyrics and comments fields.
 Titles:
-
Search the title field only.
 Lyrics:
-
Search the lyrics field only.
 Authors:
-
Search the associated authors.
 Themes:
-
Search the assigned themes.
Click the Search button to perform a search and display the
results in the song list.
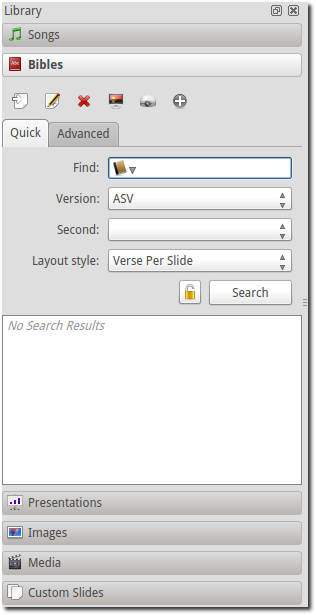
Bibles
Clicking on Bibles in the g-library will display the Bibles item. The Bibles
item shows Bible verses and provides a search function to find Bible
verses and add them to the g-service-manager.
Toolbar
- Edit
the selected bible:
-
Edit meta data or book names of the selected bible.
 Import Bible:
-
Import Bibles from a number of formats. This is discussed in detail on the
import_biblespage. -
Preview verses:
-
Send the selected verses to the
g-preview-slide-controller. - Send
verses live:
-
Send the selected verses to the
g-live-slide-controllerto be shown on the display screen. - Add
verses to service:
-
Add the selected verses to the
g-service-manager. Verses can also be added to theg-service-managerby means of drag and drop from theg-library.
Note: Right-clicking on a selection of verses will display some of the same options.
Quick Search Tab
The following options are available on the quick search tab:
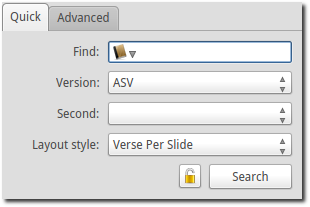
- Find:
-
Clicking the icon in the Find box displays a list of search options. The following options are available:
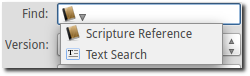
 Scripture Reference:
-
Search for a specific verse using a scripture reference format. Below is some examples on supported formats:
- Book Chapter
- Book Chapter-Chapter
- Book Chapter:Verse-Verse
- Book Chapter:Verse-End (this will display verses to the end of the chapter)
- Book Chapter:Verse-Verse, Verse-Verse
- Book Chapter:Verse-Verse, Chapter:Verse-Verse
- Book Chapter:Verse-Chapter:Verse
Note that the separators might change depending on the language chosen for OpenLP. See and customise separators under
Setttings --> Configure OpenLPon the Bibles tab.A detailed description of the format and how it is parsed by OpenLP can be read In the OpenLP API documentation.
If an invalid format is used for a search a popup window will show the examples also shown above.
- Text
Search:
-
Search by a keyword or words. Use more words to narrow down the list of results. If you search for "Jesus God" it searches sentences which contain both words, Jesus and God. If you search for "Jesus, God" separated by a comma, it searches for sentences which contain at least one of the words, Jesus or God.
- Version:
-
Once a Bible has been imported, it will be displayed in the drop down box. Select a version from the list of the Bibles.
- Second:
-
If
Display second Bible verseshas been selected in the Bibles configuration, this option will be available. This is used to display another version of the Bible for comparison. Both versions will be displayed. If there is not enough space on one slide, the Second verses will be displayed on the next slide. - Layout Style:
-
The following options are available to set how Bible verses are displayed:
- Verse Per Slide:
-
Display one verse per slide.
- Verse Per Line:
-
Start each verse on a new line until the slide is full.
- Continuous:
-
Verses flow together, separated by verse number and chapter if chapter is selected to show above.
This setting is also accessible in
Setttings --> Configure OpenLPon the Bibles tab.Note: Changes to layout style do not affect verses already in the
g-service-manager. 
 Keep/Clear Results:
-
Normally, when a search is run, the previous verses are cleared. To retain the previous set of verses, toggle this button.
Click the Search button to perform a search and display the
results in the verse list.
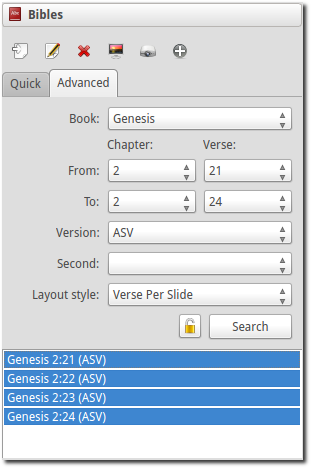
Advanced Tab
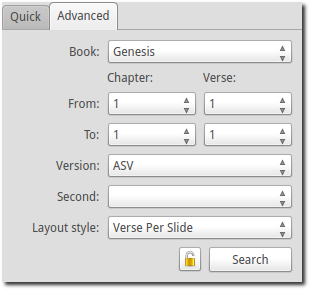
The Advanced tab is convenient for selecting Bible verses by book, chapter and verse from a set of drop down boxes.
- Book:
-
Click on the drop down box and select a book from the list.
- Chapter/Verse:
-
Select the From chapter and verse, and the To chapter and verse.
Note Version, Second and Layout Style are the same as in the Quick search tab.
Click the Search button to perform a search and display the
results in the verse list.
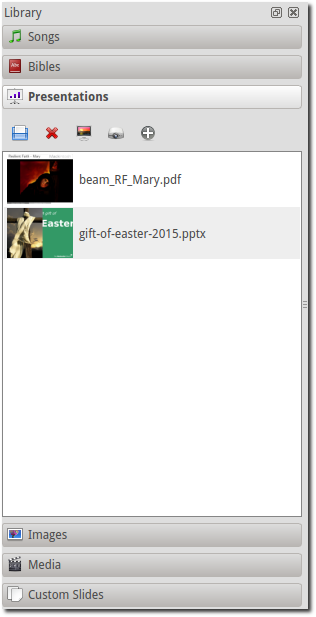
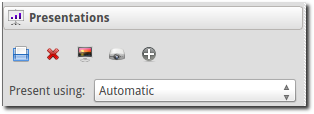
Presentations
Clicking on Presentations in the g-library will display the
presentations item. The presentations item shows a list of imported
presentations.
Toolbar
 Load
presentation:
Load
presentation:-
Import a presentation. Presentations need to be imported in order to control them from within OpenLP.
-
Delete presentation:
-
Removes the selected presentation from the list. Note that this does not delete the original presentation from the disk.
-
Preview presentation:
-
Send the selected presentation to the
g-preview-slide-controller. - Send
presentation live:
-
Send the selected presentation to the
g-live-slide-controllerto be shown on the display screen. - Add
presentation to service:
-
Add the selected presentation to the
g-service-manager. Presentations can also be added to theg-service-managerby means of drag and drop from theg-library.
Notes: Right-clicking on a presentation will display some of the same options.
Presentation items can be dragged from the desktop (or any folder) into the Presentation library plugin. This allows the selected items to be loaded more quickly. If a folder is selected, all the contacts of the folder will be added. When the items are added, only items with the correct file suffix for the plugin will be loaded. If you try to drop a presentation into the images folder, an error message will be generated.
In presentation_configure configuration it is possible to
enable Allow presentation application to be overridden,
which shows a dropdown box which gives you the option to select the
presentation application you want to use. The default is Automatic, but you can
choose any available presentation application. Note that this can lead
to unexpected behavior if the application chosen is not compatible with
the presentation.
Images
Clicking on Images in the g-library will display the images item. The images
item shows a list of imported images.
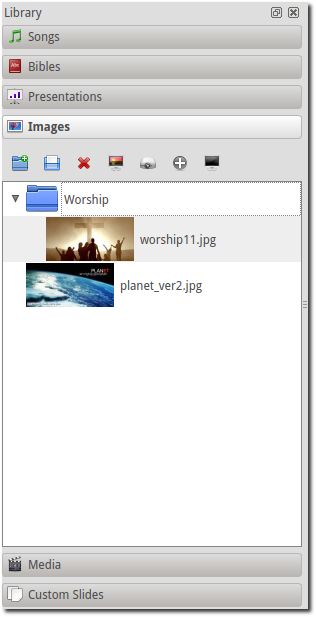
Toolbar
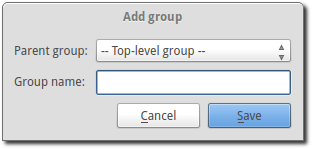
 Add group:
-
Opens a dialog where a new image group can be added.
- Load
image:
-
Import one or more images. Images need to be imported in order to be used in OpenLP.
-
Delete images:
-
Removes the selected image(s) from the list. Note that this does not delete the original image(s) from the disk.
-
Preview image:
-
Send the selected image(s) to the
g-preview-slide-controller. - Send
image live:
-
Send the selected image(s) to the
g-live-slide-controllerto be shown on the display screen. - Add
image to service:
-
Add the selected image(s) to the
g-service-manager. Images can also be added to theg-service-managerby means of drag and drop from theg-library.  Replace live
background:
Replace live
background:-
Replace the current live theme background with the selected image. This has effect until the theme changes, or the Remove Backgound button is clicked.
Notes: Right-clicking on an image will display some of the same options.
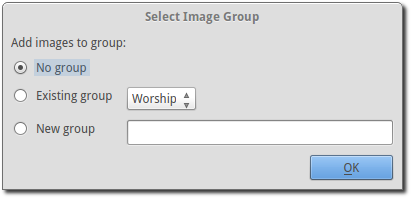
When an image is added to the library, a dialog will ask in which
group the image should be placed. The options are No group, Existing group or New group.
Images can be dragged from the desktop (or any folder) into the Images manager plugin. This allows the selected items to be loaded more quickly. If a folder is selected, all the contacts of the folder will be added. When the items are added, only items with the correct file suffix for the plugin will be loaded. If you try to drop a presentation into the images folder, an error message will be generated.
Media
Clicking on Media in the g-library will display the audio or video files in the
Library.
Note: On some computers OpenLP has trouble
displaying videos. Please read the troubleshooting for tips on how to resolve these
issues.
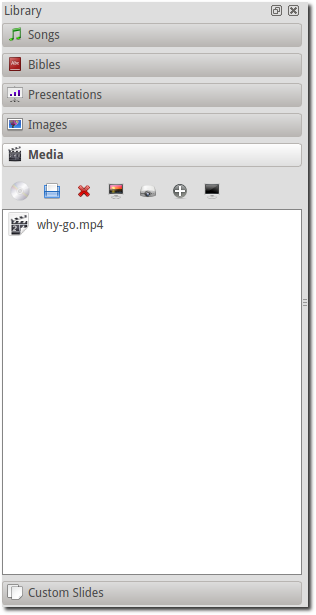
Toolbar
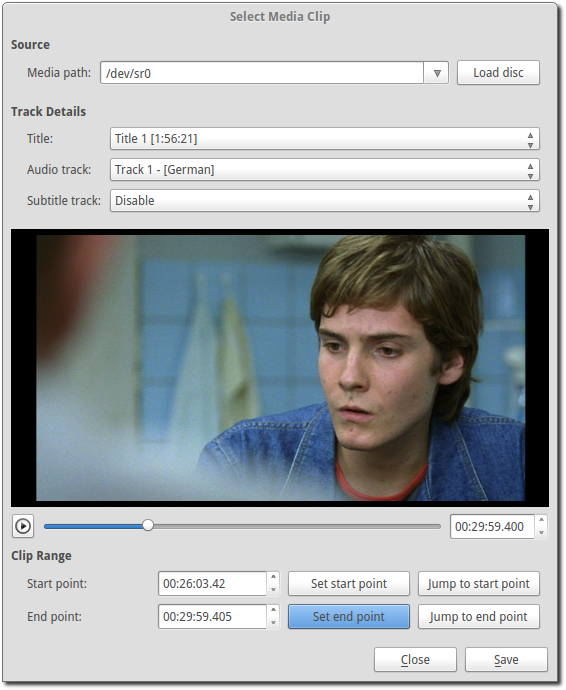
 Load CD/DVD:
-
This feature only works if VLC is installed on the computer and enabled in OpenLP. See
media_configurefor how to configure media players. Clicking the icon will bring up a window where you can load a DVD or audio CD, select a track and a range and save it as a named clip. Note that the audio CD or DVD is still required when playing the clip, even if the clip is saved to a service file.
- Open
device stream:
-
Connect to a video stream that is physically connected to the OpenLP computer.
 Open network stream:
-
Connect to a video stream that is accessable over the network connected to the OpenLP computer.
 Load
new media:
Load
new media:-
Import one or more audio and video files. Audio and video files need to be imported in order to be used in OpenLP.
-
Delete the selected media:
-
Removes the selected audio or video file(s) from the list. Note that this does not delete the original file(s) from the disk.
-
Preview the selected media:
-
Send the selected audio and video files to the
g-preview-slide-controller. - Send
the selected media live:
-
Send the selected audio or video file to the
g-live-slide-controllerto be shown on the display screen. - Add the
selected media to the service:
-
Add the selected audio and video files to the
g-service-manager. Audio and video files can also be added to theg-service-managerby means of drag and drop from theg-library.
Notes: Right-clicking on a audio or video file will display some of the same options.
Audio and video items can be dragged from the desktop (or any folder) into the Media manager plugin. This allows the selected items to be loaded more quickly. If a folder is selected, all the contacts of the folder will be added. When the items are added, only items with the correct file suffix for the plugin will be loaded. If you try to drop a presentation into the images folder, an error message will be generated.
In media_configure
configuration it is possible to enable Allow media player to be overridden, which shows
a dropdown box which gives you the option to select the media player you
want to use. The default is Automatic, but you can choose any available
player.

Custom Slides
Clicking on Custom Slides in the g-library will display the
custom slides libruary item. The custom slides item shows a list of
custom textual items. Custom slides are useful for creating unstructured
text items, such as liturgy or prayers.
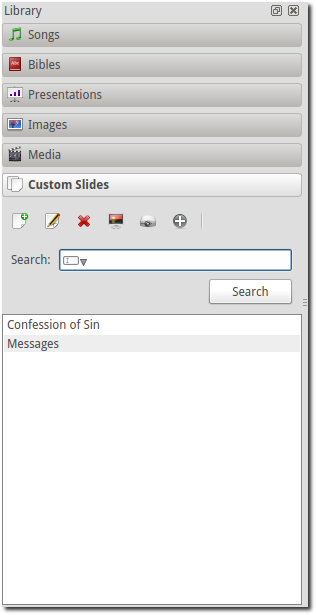
Toolbar
- Add
custom slide:
-
Open the song edit dialog to add a new custom slide.
- Edit
custom slide:
-
Open the song edit dialog to make changed to the selected new custom slide.
-
Delete custom slide:
-
Remove the selected custom slide(s) from the list.
-
Preview custom slide:
-
Send the selected custom slide to the
g-preview-slide-controller. - Send
custom slide live:
-
Send the selected custom slide to the
g-live-slide-controllerto be shown on the display screen. - Add
custom slide to service:
-
Add the selected custom slide(s) to the
g-service-manager. Custom slides can also be added to theg-service-managerby means of drag and drop from theg-library.
Note: Right-clicking on a custom slide in the list will display some of the same options.